Categories
Java

Quarkus and Angular

I am building an application to keep track of a stock portfolio. This has an Angular front-end with a REST services back-end implemented with Quarkus. The features of the first version: – manually add/remove stocks – retrieve latest prices from Yahoo Finance

This is the architecture of the application:

Project setup

Let us start with an empty project by specifying the extensions on https://code.quarkus.io and download the resulting zip. The necessary extension:

  • RESTeasy JAX-R
  • RESTeasy JSON-B

To make sure the development environment works, you start the development mode with Maven:

mvn compile quarkus:dev

In your browser, enter http://localhost:8080/hello and you will see “hello” as a response.

Add Yahoo finance API dependency

The retrieve the latest stock price, I add this dependency:

  <dependency>
    <groupId>com.yahoofinance-api</groupId>
    <artifactId>YahooFinanceAPI</artifactId>
    <version>3.15.0</version>
  </dependency>

To get the stock information, including price:

Stock stock = YahooFinance.get(symbol);

Stock REST resource

It will be necessary get the latest stock price through a REST service, so we add the StockResource:

  @Path("/{symbol}/latestPrice")
  @GET
  public Response stock(@PathParam("symbol") String symbol) throws IOException {
    Stock stock = YahooFinance.get(symbol);

    Response response = null;
    if (stock == null) {
      response = Response.status(Response.Status.NOT_FOUND).build();
    } else {
      StockLatestPriceResponse stockResponse = new StockLatestPriceResponse(stock.getSymbol(), stock.getQuote().getPrice());
      response = Response.ok(stockResponse).build();
    }
    return response;
  }

We can test this by accessing this URL: http://localhost:8080/stocks/AAPL/latestPrice

Angular front-end

To bootstrap the Angular application, run this in the src/main directory:

ng new portfolio --skipGit --routing=true --style=scss

This creates a new directory “portfolio” with the Angular code. I rename that to “angular” to make it obvious that it contains Angular front-end code.

To run the front-end, change directory to the src/main/angular directory and run ng serve. When you enter “http://localhost:4200” in your browser, you will see the example page with “portfolio app is running”.

I add the PrimeNG package – this contains nice user interface components.

npm install --save primeng
npm install --save primeicons
npm install --save @angular/cdk
npm install --save chart.js
npm install --save @fullcalendar/core

Portfolio page

Next I create a Portfolio page to display the list of stocks, and the service to retrieve the latest price.

ng generate component Portfolio
ng generate service Stock

You can see how I implemented the page on my Github repository.

Stock price service

To retrieve the latest stock price, the StockService calls the REST endpoint implemented in Quarkus.

  getStockLatestPrice(symbol: string): Observable<StockLatestPriceResponse> {
    return this.http.get<StockLatestPriceResponse>(`/stocks/${symbol}/latestPrice`);
  }

To check if it works, you can run ng serve again.

You will see errors in the browser console:

GET http://localhost:4200/stocks/AAPL/latestPrice 404 (Not Found)
GET http://localhost:4200/stocks/GOOG/latestPrice 404 (Not Found)

The Angular service expects that the Quarkus service is available at the same URL prefix, and this is http://localhost:4200. The Quarkus service actually lives at http://localhost:8080, so will will need a proxy.proxy.conf.json

{
  "/stocks": {
    "target": "http://localhost:8080",
    "secure": false
  }
}

If you have started Quarkus with mvn compile quarkus:dev, then you can start the Angular app with ng serve --proxy-config proxy.conf.json.

Combine Quarkus and Angular

So far, the Quarkus service and Angular application are separated. The Angular production build with ng build --prod produces static files that can be served by Quarkus.

By default, ng build --prod puts all produced files in the dist directory. We want those files in the src/main/resources/META-INF/resources directory. You can change that in the angular.json file:angular.json

  "configurations": {
    "production": {
      "outputPath": "../resources/META-INF/resources",

After running ng build --prod, you can start Quarkus with mvn compile quarkus:dev and load the Angular app with http://localhost:8080/index.html

Running the application

Now we have an application that we can deploy and run. Quarkus gives you the ability to run the application as a native executable. When you build the application with mvn package -Pnative -Dquarkus.native.container-build=true -Dmaven.test.skip, it will build a runner executable that contains everything it needs. This executable starts up very quickly and is great for running in a Docker container.

After building the executable, you can build a Docker image and run it:

docker build -f src/main/docker/Dockerfile.native -t quarkus/portfolio .
docker run -i --rm -p 8080:80 quarkus/portfolio

After that, you can access the application at http://localhost:8080/index.html

Categories
Java

Error log context with logback

Detailed logging

When you are developing software, you often come across unexpected situations that your software doesn’t handle correctly. In order to figure out what caused the problem, you need a detailed log of what happened and what the input data was, so that you can reproduce the situation in your development or test environment.

Sometimes the end users will produce situations and errors that we never thought of. In those circumstances it is very helpful to examine the detailed logs. Because of this, we let the software log detailed debugging information, even on the production systems. The downside is that this will produce large log files, which may fill up file systems, and there is a performance penalty for writing all that data.

Only detailed logging with error

It would be much more helpful to log all the details only when an error occurred. I came across this idea to log all the detailed debugging logs in memory and when an error occurs write this to a log file. In the logback logging library you can define your own log appender that can keep the log events in memory.

In a web service or web application request, this will be the process: – start and clear a list of log events in a ThreadLocal variable – for each append to the log, append the event to the list in ThreadLocal – when an error occurs, read the stored list of log events and append them to another log appender that will write them to a log file – at the end of the web application request or service, clear the list of log events

Log debugging context with error

The LogContextAppender records all log events in a List in ThreadLocal. When an error events comes in, the appender will send all recorded events to a separate incident appender and will clear the list.

  protected void append(E event) {
    events.get().add(event);
    if (event instanceof ILoggingEvent) {
      ILoggingEvent loggingEvent = (ILoggingEvent) event;
      Marker marker = loggingEvent.getMarker();
      if (marker != null && marker.contains("resetSession")) {
        this.clearLog();
        events.get().add(event);
      }
      if (loggingEvent.getLevel().isGreaterOrEqual(Level.ERROR)) {
        this.writeLogToIncidentLogger();
        this.clearLog();
      }
    }
  }

The application will need the reset the collected log events in the LogContextAppender to minimize the memory usage and unnecessary clutter of your error log context. You do that by logging with a marker:

log.debug(MarkerFactory.getMarker("resetSession"), "reset log context session");

In a typical application, you clear the log session at the start and end of a web application or service request. Usually you do this in a javax.servlet.Filter.

public class LogContextFilter implements Filter {

  private static final Logger log = LoggerFactory.getLogger(LogContextFilter.class);

  @Override
  public void init(FilterConfig filterConfig) throws ServletException {
  }

  @Override
  public void doFilter(ServletRequest request, ServletResponse response, FilterChain chain)
      throws IOException, ServletException {
    log.debug(MarkerFactory.getMarker("resetSession"), "start of request");

    try {
      chain.doFilter(request, response);
    } finally {
      log.debug(MarkerFactory.getMarker("resetSession"), "end of request");
    }
  }

  @Override
  public void destroy() {
  }
}

In the logback configuration, you can specify which appender to write the error log context to with errorLogger and errorAppender elements.

  <appender name="contextAppender" class="logback.LogContextAppender">
    <errorLogger>errorLogger</errorLogger>
    <errorAppender>errorAppender</errorAppender>
  </appender>

Example configuration

This configuration will log everything to standard output:

<configuration>
  <statusListener class="ch.qos.logback.core.status.OnConsoleStatusListener" />

  <appender name="stdout" class="ch.qos.logback.core.ConsoleAppender">
    <filter class="ch.qos.logback.classic.filter.ThresholdFilter">
      <level>INFO</level>
    </filter>
    <encoder>
      <pattern>%d{ISO8601}|%level|%logger{36}|%line|%msg%n</pattern>
    </encoder>
  </appender>

  <appender name="errorAppender" class="ch.qos.logback.core.ConsoleAppender">
    <encoder>
      <pattern>%d{ISO8601}|%level|%logger{36}|%line|%msg%n</pattern>
    </encoder>
  </appender>

  <appender name="contextAppender" class="logback.LogContextAppender">
    <errorLogger>errorLogger</errorLogger>
    <errorAppender>errorAppender</errorAppender>
  </appender>

  <logger name="errorLogger">
    <appender-ref ref="errorAppender"/>
  </logger>

  <root level="DEBUG">
    <appender-ref ref="stdout"  />
    <appender-ref ref="contextAppender"  />
  </root>
</configuration>

Normally, this will log info, warning and error log events to the “stdout” appender. When an error occurs, the contextAppender will log everything into the errorLogger/errorAppend.

This approach will can give you a detailed log of what happened just before the error and will also reduce the amount of logging that your application will produce.

https://github.com/koert/logback-config

Categories
Java Software development

Jenkins Multibranch Pipeline

jenkins-logoI recently upgraded Jenkins (https://jenkins.io) to the 2.0 version and had to setup all the jobs again. It is quite a manual process and I wonder if this can be automated in some way.

Gradle plugin

There exists a Gradle plugin (a plugin to use in a Gradle build script) to automate setting up a Jenkins server, see https://github.com/ghale/gradle-jenkins-plugin/wiki. This solution automates the one-time process of setting up jobs. I find this approach interesting, although a bit too much at this point.

Multibranch Pipeline jobs

In the Jenkins 2.0 version, I noticed Multibranch Pipeline jobs – these jobs get most of their configuration from a script that you put in the source repository. This is a great solution, since you can version the configuration and don’t have the manually enter at the Jenkins user interface. Another great feature is that a multibranch pipeline scans your Git repository for branches and builds all of those branches automatically.

option-multibranch

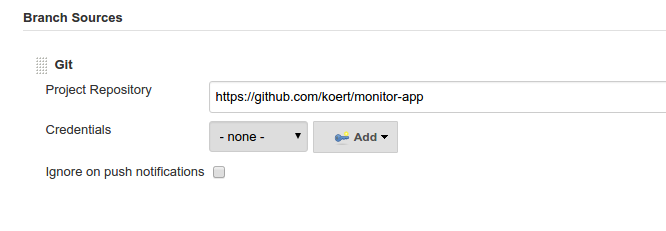
The way you configure a Multibranch Pipeline is by configuring the repository and how the build is triggered. The easiest way is to trigger periodically. That is all the configuration that you enter on the Jenkins user interface.

Selection_031

After this configuration, Jenkins will look at all your branches in the repository and look for a file in the root with the name “Jenkinsfile”. This file should contain a Groovy script that performs the build.

node {
 checkout scm
 sh "./gradlew clean build"
}

This script will checkout the branch from the repository and execute “./gradlew clean build”. After you added this file to your repository, you can manually trigger Jenkins with Build Indexing/Run Now. You will will see a list with all the branches that have a Jenkinsfile.

jenkins-branch-master


This is great if you want to make sure that the code that is committed the repository actually compiles.

To take a step further, you probably want to run your unit tests and show the results. You can just use the “test” task:

node {
 checkout scm
 sh "./gradlew clean test"
}

This will run the build and test in one step. To make a clearer overview of the whole process, you can defines stages and impose timeouts:

node {
 stage 'checkout'
 checkout scm

stage 'build'
 timeout(time: 15, unit: 'MINUTES') {
 sh "./gradlew clean build"
 }

stage 'test'
 timeout(time: 15, unit: 'MINUTES') {
 sh "./gradlew test"
 }
}

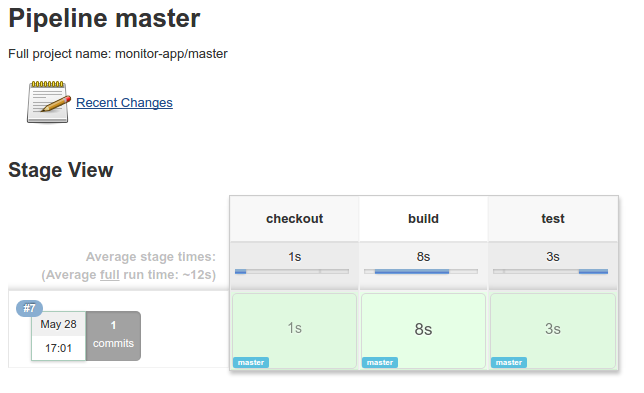
This will produce a nice report of all the stages.

jenkins-stages

Now you can quickly see how long each stage took and if it is successful.

It would also be nice to show the results of the tests, and I will explore that in another post.

Categories
Docker Java

Creating a minimal Docker image with Glassfish

docker-logoI have been using Docker to run Glassfish in a container and I noticed some news about using Alpine Linux.Apparently, you create much smaller containers with Alpine Linux. This article from Atlassian (https://developer.atlassian.com/blog/2015/08/minimal-java-docker-containers/) mentioned a minimal base image with OpenJDK.

Since I prefer to use the Oracle JDK with Glassfish 4.1, I ran a few tests myself to compare a phusion baseimage with Alpine Linux.

My Phusion based container produced an image 1130 MB large, while the Alpine Linux based image was only 392 MB. To produce a working application, I used the Primefaces showcase WAR.

I am surprised about the size differences, see the resulting images:

Phusion baseimage + Java 8 + Glassfish 4.1

phusion/baseimage         305 MB
ubuntu-oracle-jdk8        892 MB
koert/glassfish-4.1       1130 MB
koert/glassfish-showcase  1156 MB

Alpine Linux + Java 8 + Glassfish 4.1

frolvlad/alpine-oraclejdk8       170.8 MB
koert/alpine-glassfish-4.1       391.8 MB
koert/alpine-glassfish-showcase  417.8 MB

My examples at Github


Categories
Java

Functional style programming with Optional in Java 8

With the Java 8, we have a more functional style programming available and the Optional type. This type is like Option in Scala and should replace the commonly used pattern of returning null if something is not found or available.

See the below example of a repository – authenticateUser2 returns a null if it cannot authenticate the user.

Using Optional, authenticateUser returns Optional.empty is it cannot authenticate the user, otherwise it will return an Optional that wraps the AuthenticationToken with Optional.of.

Using the classical null-checking pattern, LoginService2 uses an if-then-else structure:

Using a functional style of checking for an empty result, LoginService uses the map and orElse methods:

This new style replaces 8 lines of code with 3 lines. You may wonder – what is the big deal – 5 lines of code?

At first glance, this map orElse pattern looks a little puzzling. After seeing this a few times, this new functional style describes the intention of the code more clearly than the if-then-else structure. The intention is that it returns a token, or else a not-acceptable status code.

The purpose of code is, next to implementing a solution, to communicate to the maintainer what you meant to do. We software developers sometimes spend too much time trying to understand what the code does, it would be great if we can see in one glance the intention – this will prevent many bugs and misunderstandings, and improve the quality of our work.


Categories
Java

Restful service with JAX RS and CDI on Glassfish

I was working on a RESTful service with JAX RS on Glassfish and pieced together a working implementation with CDI dependency injection.


This REST service is pretty simple, when you access /test/hello?name=John with a GET, you will get “Hello world John” back. Note the @ManagedBean annotation – this will make CDI dependency injection working in a JAX RS instantiated service.

The HelloRepository is injected with CDI:

You can package this as a WAR file and deploy it on a Glassfish server. To make this work, you need a minimal web.xml in WEB-INF:

To enable CDI, you need an empty beans.xml in WEB-INF:

And to make JAX RS working correctly and set the root path, you need this class:

To set the context root, you could also add a glassfish-web.xml in WEB-INF – this is of course Glassfish specific.

After figuring this out, it is easy to configure and doesn’t need any complicated XML. I got the above configuration working on Glassfish 3 and 4.

Categories
Docker Java

Web application development with Docker and Glassfish

Although Docker is often used to deploy/run applications in a defined environment, you can also use Docker in your development environment. To make this productive, you need an easy way to deploy and debug your web application. In the Glassfish image (see https://github.com/koert/docker-glassfish) I can add deploy a web application and hook into the file system.

Glassfish provides an autodeploy directory – just copy a war or ear file to this directory and Glassfish will deploy this automatically. You can mount this directory to your host with the -v option:

docker run ... -v ~/tmp/glassfish/deploy:/opt/glassfish4/glassfish/domains/domain1/autodeploy ...

To view the logs directory you can add this:

docker run ... -v ~/tmp/glassfish/logs:/opt/glassfish4/glassfish/domains/domain1/logs ...

I cloned a copy of the Spring petclinic application (https://github.com/koert/spring-petclinic) to setup my development environment. Curiously, I needed to add “implements Serializable” to BaseEntity, to make it work on Glassfish 4.1. Normally, the petclinic application creates its own datasource, not a JEE datasource. I changed the configuration to use the Glassfish datasource.

The Glassfish server now needs a datasource configuration, including the database driver implementation for hsqldb. By adding the jar to /opt/app/extlib, the driver is copied to the Glassfish lib directory – this makes it available for datasources.

The configure-glassfish.sh (in /opt/app/bin) script creates the necessary datasource:

asadmin create-jdbc-connection-pool --restype=javax.sql.DataSource --datasourceclassname=org.hsqldb.jdbc.JDBCDataSource \
 --property "user=sa:password=sa:url=jdbc\:hsqldb\:hsql\:mem\:petclinic" \
 PetClinicPool
asadmin create-jdbc-resource --connectionpoolid PetClinicPool jdbc/petclinic

In the Dockerfile I add the hsqldb jar and the configure script:

ADD hsqldb-2.3.2.jar /opt/app/extlib/hsqldb-2.3.2.jar
ADD configure-glassfish.sh /opt/app/bin/configure-glassfish.sh

After building the Docker image, you can run Glassfish with the necessary configuration:

docker run --rm -it -v ~/tmp/glassfish/deploy:/opt/glassfish4/glassfish/domains/domain1/autodeploy \
 -v ~/tmp/glassfish/logs:/opt/glassfish4/glassfish/domains/domain1/logs \
 -p 4848:4848 -p 8080:8080 -p 9009:9009 \
 -e DEBUG="true" koert/glassfish-showcase

The “–rm” option instructs Docker not to keep the state of the started container, so you can start the image fresh every time. The “-it” option keeps the container running in the foreground – you can stop it with Ctrl-C.

While this is running, you can deploy your web application by copying its war or ear file to the ~/tmp/glassfish/deploy directory. You can debug the application by letting your IDE connect to port 9009.

This way you have a consist development environment with a well defined state.

Categories
Docker Java

Packaging a webapp with Docker and Glassfish

As I wrote in a previous article, you can run Glassfish in a Docker container.

The purpose of Docker is to package everything into a container so that you can run your application anywhere in a consistent state. To achieve this with a web application and Glassfish, you package the Java virtual machine (JDK 8), Glassfish 4.1 and your web application together.

I created an example of using my base Glassfish image with the Primefaces showcase war file:

FROM koert/glassfish-4.1
MAINTAINER Koert Zeilstra <koert.zeilstra@zencode.nl>

RUN wget http://repository.primefaces.org/org/primefaces/showcase/5.2/showcase-5.2.war -O /opt/app/deploy/showcase.war

This will download the war file and put it into the /opt/app/deploy directory – the startup script will copy this file into the Glassfish autodeploy directory. When Glassfish starts up, it will automatically deploy the war and you can access the applciation after starting with:

docker run -d -p 8080:8080 koert/glassfish-showcase

On my laptop it starts up in about 12 seconds, you can look at the application in your browser: http://localhost:8080/showcase

Look at my example on Github: https://github.com/koert/docker-glassfish-showcase

Categories
Java

Devoxx 2014

Chet Haase
Chet Haase

Devoxx had a lot of interesting sessions this year. It is great to see what the movers and shakers of the IT industry are doing and where the innovation is going.